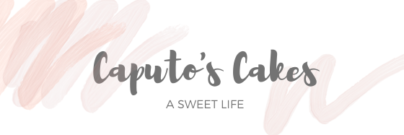
I’m so excited to share this 4th of July cake with you today! I had a lot of different ideas for this cake, but in the end I decided on making a double sided cake. Since its almost the 4th of July holiday, I wanted my cake to somewhat look like the American flag, so I knew I needed to incorporate red white and blue, and some white stars. I also wanted to try a new cake technique that I haven’t really done before.
What is a double sided cake? A double sided cake is a technique where ½ of the cake is decorated with one design (color, texture etc), and the other ½ is decorated in a different design. Today I’m going to walk you through how I made my double sided 4th of July flag cake.
Follow along with me as I list the supplies, steps, and time-lapse video below:
Supplies used for this cake:
- American buttercream (my recipe HERE), colored in red, white and blue
- White fondant stars
- Icing smoother , stripe comb
- Textured Comb
- Wilton tip numbers: 1M, 21, 32
- Piping Bags
Supplies for fondant stars:
- White Fondant
- Star cookie cutter
- Fondant rolling pin
- Corn starch (for dusting the fondant, roller and counter)
How to Decorate a Double Sided Cake:
Step 1: To start, bake your cake and once cooled, add a crumb coat. Chill in the fridge for 30 minutes.
Step 2: Using your cake comb, mark the half way point on the cake. This mark will help act as a guide for the next step.
Step 3: Using the guide lines, pipe your buttercream colors on the cake. I piped the blue buttercream on one side of the cake, this half is where I wanted to use my textured cake comb. On the other half of the cake I piped my white buttercream, where I would be using my stripe comb to mimic the red and white stripes on the flag.
Step 4: Pick one side of the cake to focus on, and begin smoothing out the buttercream. I started with my blue side, and used my textured cake comb to help me smooth out the icing. The challenge with decorating half of a cake at a time is that the icing will pile up on the half-way mark of the cake (this half-way point is what I like to refer to as the “seam” where both sides meet). If this happens to you, that’s ok, this “seam” will be covered up later. Once I finished smoothing out my blue side, it was time to work on my stripe side.
Step 5: To make buttercream stripes, you first want to start smoothing out your icing with a striped comb. This might take a few minutes to really see the stripes appear. After the icing is smoothed out, you will need to chill the cake for about an hour to get the buttercream really cold. If you would like to read more on how to decorate a striped cake, be sure to visit my post HERE.
Step 6: After the buttercream is chilled, it’s time to add the second color to your stripes. I used red buttercream for my cake. Taking my red icing, I piped on the stripes where my cake comb had left an indent. After piping on my red, I took my icing smoother, and scraped off the excess buttercream on the stripe half of my cake. As always, this takes a lot of patience, but you will slowly see your stripes emerge. Continue scraping this half of your cake until you are content with your stripes. Put the cake back in the fridge for another 30 minutes to firm up the buttercream icing.
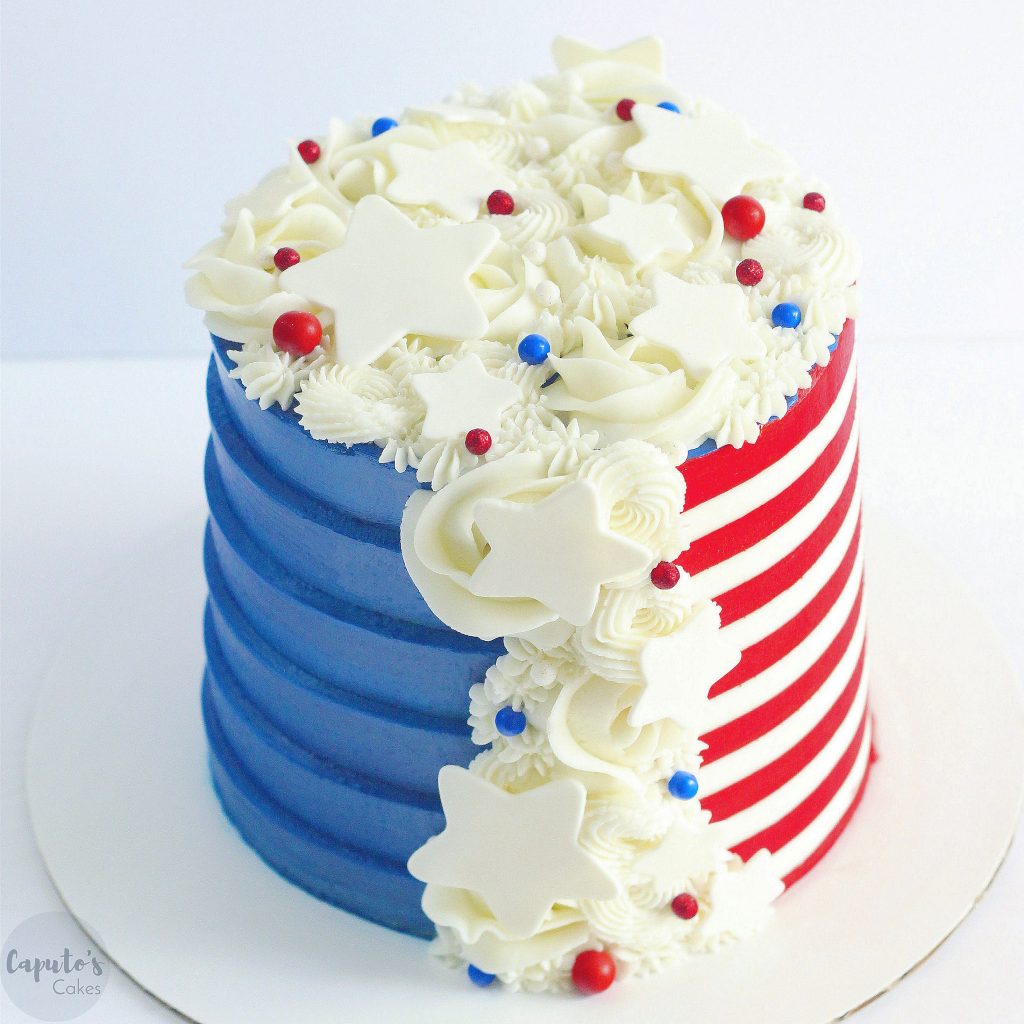
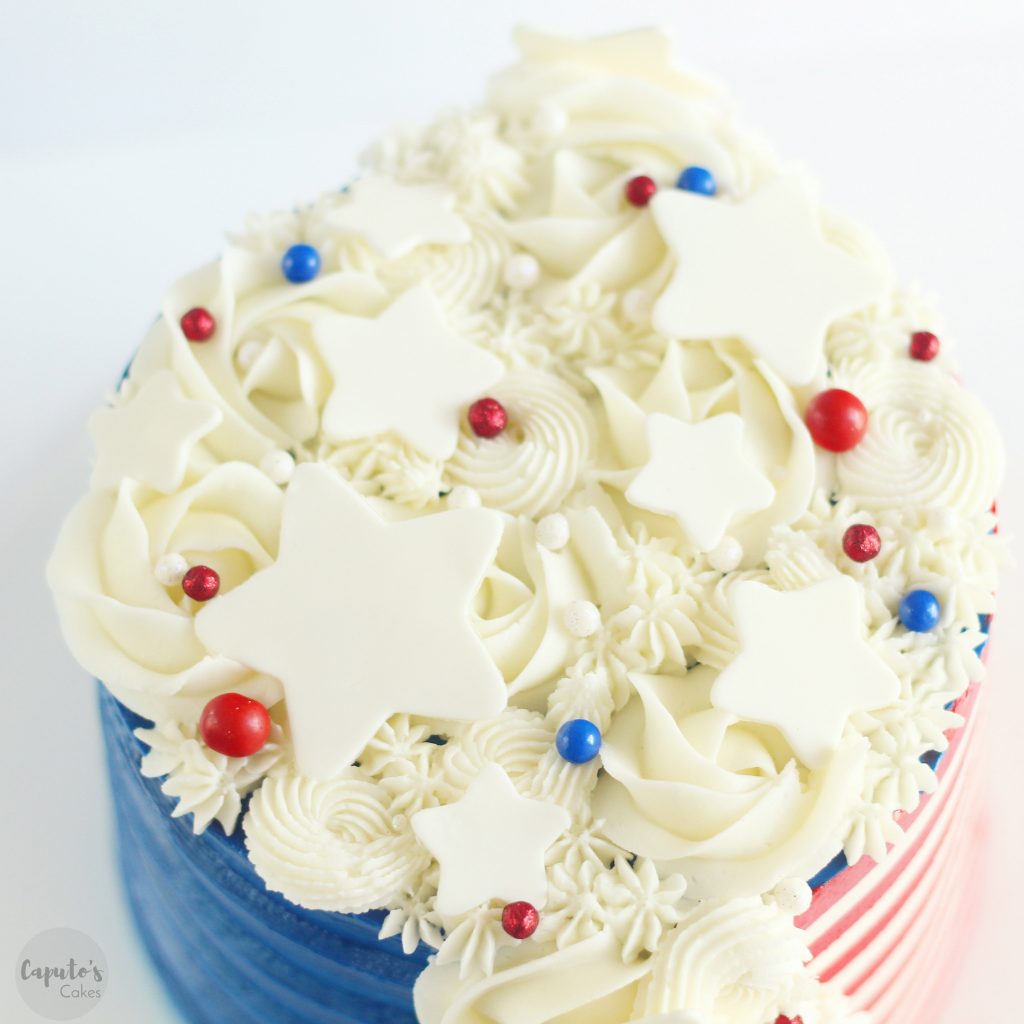
Step 7: To finish the cake, you will need to cover up the seam. I found that the easiest way to do this was to pipe different rosettes up the side of the seam and continue the piping design on to the top of the cake. I used Wilton tip numbers: 1M, 21 and 32, to pipe my designs, making sure to cover any flaws in the buttercream. After this step I stuck the cake back in the fridge to firm up the buttercream for a bit.
Step 8 (optional): Since I wanted to mimic the American flag, I decided to add on a few white fondant stars to my cake. To make the fondant stars: Roll out a small amount of fondant, using a star cookie cutter, cut out your fondant stars and lay them flat to dry for a few minutes. When adding them to the cake, you can use a bit of buttercream on the back of each star, and place them around the cake. For my cake, I added the stars along the piped “seam” and on top of the cake. I also used some red, white and blue sprinkles to add some more color to the cake.
I really enjoyed the challenge of making a double sided cake, and I will definitely continue to make some more, I think its a perfect cake design for holidays, gender reveals and joint birthday parties!
Double Sided Cake Time-Lapse Video:
Click HERE for my cake decorating tips and recipes.